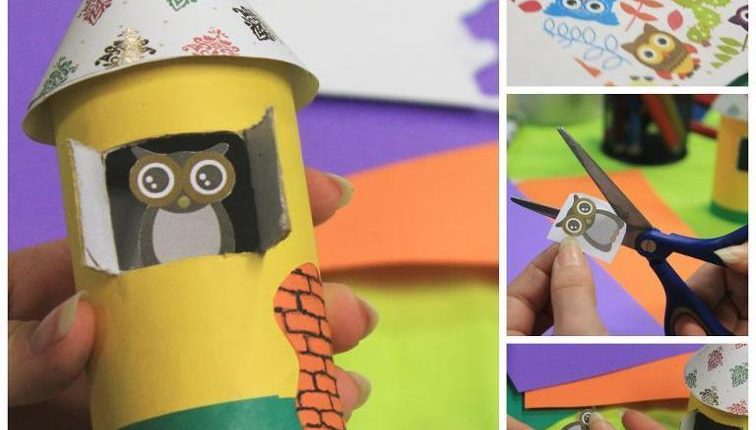
DIY Adorable Tiny Paper Birdhouse
Hey, crafters! Christmas is almost here! With the approaching holidays, we become more lovable, humble, and better persons. Besides, we spend much more time at home, cleaning, cooking, and decorating. Handmade decorative elements are always better than the store-bought ones for the reason that you have invested love and diligence, and when the kids are involved, in the process the results are simply priceless. To me, personally, there is no better time than the one you spend with your children. The project that I’m going to present to you is extremely easy to complete, fun and kids just love these tiny houses. If you don’t believe me, check it out for yourself:
What you need:
- Patterned paper
- Glue
- Scissors
- Colored papers (I used yellow, orange and green)
- Toilet paper roll
- Model knife
- Wide tape
- Small owl (I downloaded and printed a sheet with owls and cut one)
- Color marker
Instructions:
- First take the cardboard roll and stick it all over with the colored paper (I used a yellow one but you are free to choose a different color for your birdhouse). You can spray paint it too if you have a spray at hand – mine was over so I used paper. Glue the edges thoroughly – they usually come off easily and you might apply an extra layer of glue if needed.

- Outline the windows with a pencil and cut them through the roll with a craft knife.
- Draw a circle on the reverse side of the patterned paper with compasses or with a small plate. It will be the roof of the birdhouse – if you make the circumference bigger, the roof will be higher.
- Cut a straight line from the end to the middle of the circle and fold it so that you form a cone. Fix it with glue or with a double-sided tape.

- Use the wide tape to attach the roof to the toilet roll. Stick half of the stripe on the inner side of the roll and the other half on the inner side of the roof. Press the tape with a long object (it was hard for me to reach so deep inward with my fingers) to stick it well.

- Cut a thin strip of paper in a different color (I chose a green one) and glue it to the base of the wall.
- Now let’s decorate the exterior side of the birdhouse. For the purpose, draw bricks on a sheet of orange paper and cut them in a curved shape. Glue them near or below the window.

- Print and cut a small owl to fit the window frame. Stick it from the inside of the birdhouse with a tiny strip of tape.
- And last, tint the inner side of the windows with the marker.
Hope you guys like my artwork and will be happy to see your works. Happy holidays!

- Five Changes to Apply to Your House Before Selling It - June 28, 2022
- How to clean and organise your summer house - January 27, 2022
- How Often Should Pest Control Visit Your Home? - January 13, 2022


